| Step 1 | From white on white print fabric, cut one piece 13" x 61" for table runner backing. Cut four pieces each 10" x 15" for place mat front. Cut four pieces each 18" square for napkins. |
| Step 2 | From red print fabric, cut four pieces each 10" x 15" for place mat backing. Cut four pieces each 18" square for napkins. |
| Step 3 | From blue print fabric, cut two pieces each 1-1/2" x 61" and two pieces each 1-1/2" x 14" for runner binding. Cut 1-1/4" x 72" for place mat borders. |
| Step 4 | Cut fabric pieces for each block from remaining fabrics according to paper pattern. |
Table Runner: |
| Step 1 | Make 20 copies of block pattern see piecing instructions below. |
| Step 2 | Using paper piecing instructions, make 20 blocks with fabrics. |
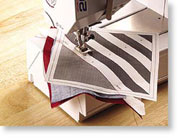
| Step 3 | For runner top, arrange blocks matching blue sections together (see photo) in two rows of ten blocks each. Stitch blocks together. |
| Step 4 | Stack top, batting and backing with right sides out. Baste layers together. |
| Step 5 | Using white thread, quilt as desired. Trim backing and batting to match front. |
| Step 6 | Stitch long binding pieces to each long edge of runner top. Press raw edges of runner binding under 1/4". Turn to back of runner and hand sew edge of binding in place. Repeat with short binding pieces on short edges of runner. |
Napkins: |
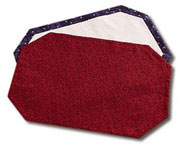
| Step 1 | Stitch matching red and white fabric squares right sides together, leaving an opening for turning. Turn right side out. Press. |
| Step 2 | Fold raw edges of opening to inside and sew closed. |
Place Mats: |
| Step 1 | Stitch 1-1/2" border strips to long edges of front piece, right sides together. Repeat on short edges. Press. |
| Step 2 | Fold each corner of front in to form a 45 degree angle at fold. Press a crease in fabric at each fold (Illustration). Trim off each corner 1/4" from crease. |
| Step 3 | Extending cut end past edge slightly, stitch 1-1/2" border strip to one diagonal raw edge. Press seam allowance toward border. Cut ends of diagonal border to match outer edge of horizontal and vertical borders. Repeat at each corner. |
| Step 4 | Attach interfacing to wrong side of place mat front piece and to back pieces. Trim back piece to match shape of front. Stitch front and back right sides together, leaving an opening at center of one long edge for turning. Trim seams at corners. Turn right side out. Press. Sew opening closed. |
Paper Piecing Instructions |
| Step 1 | Each paper piecing pattern is used just once. Make enough copies to match the number of blocks in the design. |
| Step 2 | You stitch the block together on the paper, following the printed lines; then tear the paper off and discard it. |
| Step 3 | The number sequence on the paper pattern shows you which order to add the fabric pieces as you work. |
| Step 4 | The paper pattern keeps your fabric from stretching as you sew and each block will be the same finished size. |
| Step 5 | Trim the paper to about 1/2" beyond the outer edge of the block pattern. Keep the paper block whole; do not cut out the pieces of the design. |
| Step 6 | During piecing, the fabric pieces need to be just large enough to completely cover the patch outline on the paper pattern, extending at least 1/4" beyond the outline of the patch. |
| Step 7 | You do not have to be exact when cutting the fabric pieces, but you do want to allow enough for the seam allowances. Better to be too large than too small. |
| Step 8 | Before adding each new fabric piece to the paper pattern, make sure it is large enough to cover the patch outline on the pattern. |
| Step 9 | When joining the fabric pieces, set the machine to make small straight stitches (18 to 20 per inch). Begin and end the stitching 1/4" from each end of the pattern line you will be working over. Do not backstitch at the ends of the seam line. |
| Step 10 | When pressing your work, use a dry iron and press straight down. Do not use steam. Finger pressing works well also. |
| Step 11 | Do not tear any of the pattern away until block is complete. |
| Step 12 | To begin each block, position fabric piece No.1 right side up on the unprinted side of the pattern in its correct location. If you cannot see the edges of the fabric through the paper, hold the layers up to a light and check to make sure the edges extend far enough past the outline. Adjust if needed and pin or glue fabric in place on wrong side of paper pattern. |
| Step 13 | Pin fabric piece No.2 over fabric piece No.1, right sides together. With printed side of pattern up, stitch along the seam line between the two patches. Press. Turn fabric side up and press seam open. |
| Step 14 | Fold the paper pattern back on itself along the line you just stitched. This exposes the seam allowance and allows you to trim the allowance to 1/4". |
| Step 15 | Add each new fabric piece in the same manner as piece No. 2. When piecing is complete, trim outer edge of block 1/4" from outer seam line on pattern. |